Archive
Beer Braised Pork Ribs
Before I get today’s story and recipe, I thought I’d share that today’s entry marks my 50th.
I assume somewhere in the blog-o-sphere, this is considered a major accomplishment. But honestly, since I don’t own the blogging handbook, I really have no idea. Regardless if 50 is considered an accomplishment, I’m going to give myself a pat on the back because I think it’s pretty special. Maybe I should have made a cake?
As I stated on the first day I got this up and running, I mainly do this for myself. But I have to admit, it’s pretty cool when a total stranger, half-way around the world follows me regularly. Knowing this person took time to sign up to find out what I have to share is something I really didn’t expect.
So all you regulars, THANK YOU! I hope you continue to enjoy what I have to say, and obviously, what I’m cooking. Hopefully I’ve even inspired a few of you try something you really didn’t think you could do.
If this is your first time stopping by, thank you as well. Maybe you’ll like what you see enough to want to come back.
********************************************************************
Today’s recipe is Beer Braised Pork Ribs. In my best attempt to mimic Homer J. Simpson….”Mmmmmmmm Beeeeer.”
I recently attended one of Pittsburgh’s premier events, The Big Pour. This event, now in its 6th year, is held annually to benefit Pittsburgh’s only (I believe) non-profit building material reuse retailer, Construction Junction.
The Big Pour allows anyone who is lucky enough to get a ticket (the event sells out in minutes) an opportunity to sample several types of beers from over 40 different craft breweries, as well as local food from area restaurants. There really are no restrictions on how much you enjoy (that is until the keg runs dry).
The Big Pour is truly a beer lover/foodie paradise and my belly left happy. More importantly, it left me with a nice feeling knowing that I’m helping out a good cause.
So what is Construction Junction?
Let’s say you’re remodeling your bathroom. Instead of taking that old sink to the curb where it will eventually take up space in the landfill, drop it off at Construction Junction (or arrange for a pick-up). As as long as it is still in working condition, they’ll take it off your hands. Not only can you drop off, but you can browse and buy. For example, if you’re looking for an old door (or anything really) to re-purpose, stop by CJ and they might have something you need.
So next time you have something to get rid of, think twice before letting the garbage men take it.
Ah…..feels good to give back.
Ok, enough of that….here’s the Beer Braised Ribs recipe which I found in the Food Network Magazine. I don’t deviate from the ingredients all that much (just a slight tweak in the amounts).
This recipe is one of my all-time favorites. I enjoy the “gravy” it makes and a nice roll or hunk of bread comes in handy for sopping up the juice. The recipe is perfect for those cold fall and winter nights. Enjoy!
Ingredients:
|
Lemon and Rosemary Chicken
Today I had a great conversation with a co-worker and good friend. We talked about a bunch of things and he gave me some pretty solid advice. While most of the conversation was serious, we eventually circled back to food and beer. We got on the topic of my blog which he and his wife really like. While I mainly do it for myself, I have to admit it’s really nice to know that people not named Dennis actually read it.
During our talk, he gave me some cool compliments and asked, “How long does it take to write a blog entry?” While I gave him the answer it did give me the idea to do a quick Q&A blog entry.
Here’s a few (and a recipe too).
Q: How long does it take to write a blog entry?
A: Typically I write most entries in less than an hour. Actually, I write it in less time than that but I always go through a series of revisions, mainly for typos, sometimes for content, to get it to my liking, but I don’t think its ever been longer than an hour.
Q: What was my favorite blog entry to write?
A: My favorite so far is the “Basil-Garlic Rubbed Grilled Pork Chops.” I write this blog for fun, and had a lot of fun writing that story in particular. To me, it was the essence of what I want my blog to be. A fun, creative way to tell a story about the meal I’m preparing. That entry had all the elements that made me want to continue writing.
Q: What was the hardest blog entry to write?
A: The LOST Supper blog was difficult. Mainly because I felt like I was writing a restaurant review. I didn’t want it to come off as such so I played around with a couple of different versions before I settled on the one that I ultimately published.
Q: What recipe was I most eager to share?
A: Tie between Shooter’s BBQ Sauce and Shooter’s Secret Spice Dry Rub. Mainly because they’re tried and true and 100% all mine. Additionally, anyone that has tried it has liked it (or they lie really well).
Q: What future recipe am I most eager to share?
A: Beer Braised Ribs. It’s just a delicious recipe. Good comfort food. A hearty Fall or Winter warmer. And most of all, easy to make (psst go buy a dutch oven).
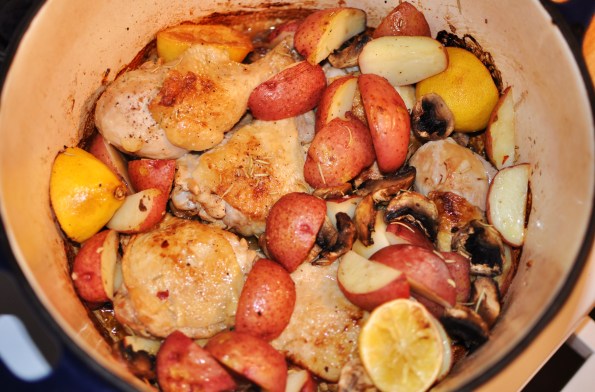
In the meantime, here is another recipe that makes use of my dutch oven. The original recipe which I adapted from Food Network, says to use a cast iron skillet and that will certainly work, but I don’t have one large enough to accommodate everything in this recipe so I improvised. I also used dried rosemary instead of fresh and thighs/legs instead of bone-in breasts. I simply think dark meat stands up better to the high heat. Enjoy!
Ingredients:
|
Chicken Piccata
Ahhh, the chicken breast. I have such a love-hate relationship with you!
Let’s talk pro’s and con’s of the chicken breast.
Pros:
They’re extremely healthy when the skin is removed.
They’re readily available and I usually always have them on hand.
While more expensive than a chicken’s darker body parts, they’re a lot cheaper than other meats.
There are so many different ways to prepare it (versatility is a cook’s friend).
Cons:
The skin is full of fat and calories.
They need lots of jazzing up otherwise they’re plain, boring, and tasteless.
Overcook the white meant and its more dry than the Arizona Desert. But if you under cook it, bad things happen.
Damn you chicken breast!!
All kidding aside, the chicken breast really can be a cook’s best friend. Just find a decent way to keep it healthy while keeping it moist at the same time and your family (and your waistline) will love you for it.
This chicken dish is light, refreshing, and super moist you don’t even need a knife to cut it.
Go easy on the egg and flour and it can be pretty healthy too as each breast comes in at just under 300 calories.
What’s even better is that it is quick to make — easily under 30 minutes — and its cooked in one pan, so clean up is even easier.
Enjoy!
Ingredients:
|
Chicken Cacciatore
It’s another cool, crisp September day. I’m beginning to wonder if Summer is behind us and Autumn is here to stay.
If so, that makes me happy. Its my favorite season.
Something else that would be happy is my Dutch Oven which often gets neglected in the Summer.
Well trusty, heavy-bottomed (I mean that in a nice way) cookware, fear no more, Autumn is your time to shine.
With it’s versatility and ability to retain heat the Dutch Oven is the perfect vessel to cook most anything. Sauces, soups, stews, chili, and even bread (all you Pinterest junkies know the bread I’m talking about) all get the Dutch workout.
They’re especially good for recipes that require a braise.
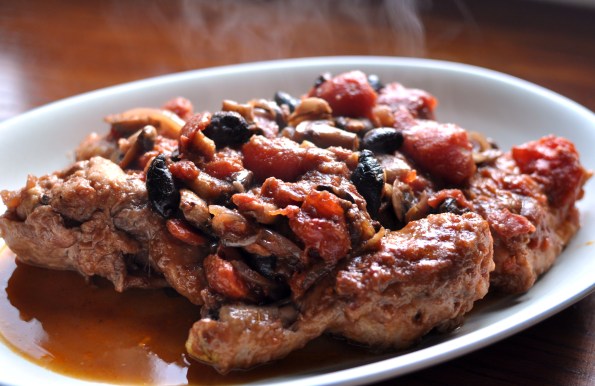
One such recipe is Chicken Cacciatore. (Here’s your Italian lesson – Hunter’s Chicken)
This is another one of those Mom-inspired dishes that is easy. But like most things she made, the recipe card wasn’t included. So in order for me to recreate it as close as possible, and with my Mom no longer with us, I needed to find a good Italian to show me the way.
Giada De Laurentiis? Love her but despite her ability to over-enunciate any Italian word with drama and flair, she’s not Italian enough for me.
Guy Fieri? The name is Italian but that’s about it.
Lidia Bastianich? She has a successful Italian restaurant here in Pittsburgh, but she’s actually Croatian. Who knew?
Surely somewhere on the information super-highway (people still call it that right) there has to be someone to teach me the way.
That person, and my new favorite chef because of the ease of his recipes is Fabio Viviani. He reminds me of the way my mom used to cook. Nothing fancy or over the top – just simple, delicious home cooked dishes.
He was a contestant on Bravo’s “Top Chef”. However, if you’ve never watched (like me) you can see Fabio cook on his web series for Yahoo called Chow Ciao. It’s humorous, without being obnoxious and really down to Earth. Highly recommended. New episodes premiere every Monday.
I followed Fabio’s Chicken Cacciatore recipe pretty closely but made some adjustments to how long I cooked it to guarantee the chicken was fork tender.
Here is his recipe (with my slight modifications). Enjoy!
Ingredients:
|
Sweet Heat Meatloaf
In my opinion, there are 3 basic comfort foods: macaroni and cheese, anything served with a biscuit on the side, and meatloaf.
As a little kid I was never a big meatloaf fan. Mainly because I wasn’t thrilled with my mom’s version. She served it with some sort of tomato based sauce that she called “gravy.” Sometimes I didn’t know what that little Italian lady was thinking.
But that changed as I grew older and learned to appreciate just about anything my mom put in front of me.
Meatloaf is one of those things that you either love or you hate. There are cafeteria horror stories that people want to forget and there are memories that bring people back to their happy place. No in between with meatloaf.
Meatloaf, while pretty basic in nature, still affords many different versions and everyone has their own. Some use bread crumbs, some use actual bread, and me, I use saltine crackers (but sometimes I use the other things). Of course everyone has that special something that makes it their family secret.
Then there is the debate of whether to glaze or not to glaze using some tomato based product, typically ketchup.
I like it glazed….my wife doesn’t. Awkward!
I could do half and half but its not worth it and I just make it her way. We usually smother with gravy anyway.
I was however, dying for her to give the glazed version a try.
So what did I do? I did the sneak attack version and glazed it but didn’t tell her. So when it came out of the oven, she smelled something sweet and she was on to me. I told her to try it….worst case she could cut off the crusty glazed part and still be able to enjoy it.
What I didn’t tell her was the hook, line and sinker that would allow me to glaze it all the time. Instead of ketchup, I used a combination of brown sugar, ketchup and Sriracha. Sweet and spicy, how could she resist?
She didn’t and the rest is history. Enjoy.
Ingredients:
|
Pork Tacos
I’ve lived in Pittsburgh for 35 years and for as long as I can remember, weather in this town has always been a major topic. Perhaps it is because the city is made up of so many different types of personalities, that weather becomes the one thing everyone relates to. I get it, but must we obsess? Must our newscasts devote more than just a minute or two discussing what anyone who has looked or been outside already knows? Must everyone (and their mother) post a picture of the temperature on Facebook? January and February it gets very cold and it snows. In the summer months its hot and humid. That’s fact in Pittsburgh – no need to dwell and complain.
Since it is late June and usually that means its hot, sometimes more hot than normal temps (notice I’m stating fact, not complaining), the last thing I want to do is cook. But alas, I have a family to feed and a blog to write (although the latter is obviously optional).
When the dew point is high and temperatures begin to creep up, grilling becomes my best cooking option. However, I understand some of my readers may be intimidated by the grill (i.e. bored of the grilled goodness category), so I’m going with a crock pot recipe (which is the next best cooking option when its hot). If you want to grill, check out my grilled pork tenderloin recipe and serve it up on a tortilla using any toppings you wish.
Whether you fire up the grill or use the crock pot recipe below, you’ll find both recipes are a cinch to make. They’ll easily feed a family of 4 (with leftovers) and most importantly neither one will heat up your kitchen on those hot summer days. I recommend mixing up a delicious frozen Margarita to beat this EXTREME HEAT. Now if you will excuse me, I need to wipe the sweat from my brow.
Ingredients:
- 1 large or 2 small pork tenderloins (about 1.5 lbs)
- 2 cups of chicken stock (or 1 cup stock, 1 cup water)
- 1 package of taco seasoning
- 1 can of pinto or black beans, drained and rinsed (14 ounce)
- 1 can of diced tomatoes (14 ounce)
- 1 can of green chilies, diced (4 ounce)
- 1 package of frozen corn
- 16 corn tortillas
- Garnish: Cilantro and Cotija, Queso, or cheddar cheese
Mix together the broth and taco seasoning.
Next, add all ingredients except corn and tortillas to the crock pot cover and cook on low for 8 hours.
Once the pork is cooked, shred it and add back to the pot. Add frozen corn, stir. Let cook another 30 minutes.
When ready, warm tortillas using a skillet heated with olive oil (30 seconds per side). Place in a warmer (or between a few sheets of paper towels) until ready to use.
Using TWO corn tortillas for each taco (or 1 flour tortilla) add a few heaping spoonfuls of the cooked pork mix using a slotted spoon. Top with cheese and cilantro. Finish with a fresh squeeze of lime juice. ENJOY!
Simple Grilled Chicken
I like to splurge on meals from time to time (lobster rolls and high quality steaks come to mind). But for the most part I’m pretty frugal when it comes to shopping. I try to plan my meals based on what’s on sale and the majority of the time I head to the grocery store with a list to keep me on track. If you look close at the pictures of the ingredients on most of my blog entries, you’ll often see store brand items. I used to clip coupons but I think those extreme-coupon people ruined it for us little folk and it doesn’t seem worth it these days. With the economy rough, I have to cut back when I can.
So when looking for that inexpensive ingredient on which to base a good dinner, I often turn to the simplicity and versatility of dark meat chicken.
Using well-stocked pantry items, I can usually feed the whole family for less than 5 bucks. Catch it on sale and its even cheaper. Not only is it inexpensive, the combinations of flavors are endless.
Want Asian flavors? Use soy sauce and ginger. Game day? Try going “buffalo style.” Want something everyone loves? Add a spice rub and your favorite bbq sauce. Not feeling anything in particular? Keep it simple and refreshing and give this recipe a try.
Ingredients:
- 6-8 pieces chicken (dark meat)
- 3 Tablespoons Soy Sauce
- 2 Tablespoons Honey
- Tablespoon of Olive, Canola, or Vegetable Oil
- Juice of 1 lime
- 1 Clove Garlic, minced
- Cilantro (about 2 tablespoons roughly chopped)
Add all ingredients in a bowl, whisk to combine.
Place chicken in a zip-top bag.
Pour ingredients over chicken and seal, getting as much air out as possible.
Let sit at room temperature 30 minutes (or refrigerate as long as overnight — preferred)
Grill chicken on high heat 2-3 minutes per side.
Lower grill to low heat and continue grilling approximately 25-30 minutes or until internal temperature reaches 180 degrees (or juices run clear).
Meatball and Eggplant Sandwich
I love a good meatball sandwich, but the main problem is that a round piece of anything doesn’t particularly work well as a sandwich. It’s clumsy to eat. Sometimes the meatballs roll off, creating a mess. Other times the placement of the meatball forces me to take a half-bite…maybe even a bigger bite than I otherwise would attempt. Perhaps I’m alone in this, but I’m confused at the success of this awkward sandwich.
So one day while watching an episode of Food Network’s “Sandwich King”, it provided me with that “ahh ha” moment. The show, all about sandwiches, featured something that I wish I thought of — a flat meatball sandwich. Brilliant!
OK, so you’re thinking that a flat meatball has been around a long time — it’s called a hamburger. Not quite. For me, a hamburger showcases the excellent beefy flavor. The meatball on the other hand is designed to showcase all of the ingredients giving it that distinct Italian flavor profile. Then when you top the meatball with fresh ingredients such as roasted red peppers and fresh mozzarella, you begin to see the separation.
I drew inspiration for this sandwich from Jimmy & Nino’s Italian Market in Pittsburgh famous “Strip District.” Their sandwich, known as the Meatball-Eggplant Duo is very good, but I think my version is good as well….and much easier to eat.
Ingredients:
- 1 pound of meatball mix (see my recipe here)
- 1 small eggplant, sliced in to 3/4 inch rounds
- Roasted Red Peppers
- Fresh Mozzarella, sliced
- Kosher Salt
- Fresh Ground Pepper
- Ciabatta Bread (or other crusty bread)
Place eggplant rounds on a wire rack. Sprinkle both sides with kosher salt to draw out excess moisture and bitterness.
Wait about 15-20 minutes then blot dry with paper towels.
Preheat grill to medium-high.
Take the meatball mix and form a patty about 1/2 inch thick. Grill approximately 3-4 minutes on each side. (Could also be baked or pan fried).
Brush eggplant on both sides with olive oil. Sprinkle salt and pepper on each side. Grill approximately 3-4 minutes on each side (Can also be roasted).
When finished, remove from grill and place in a bowl covered with plastic wrap. This will steam the eggplant to make it a tad bit softer. Let sit 10 minutes (more or less depending on desired texture).
Brush olive oil on bread, grill just a minute or two for crunch.
When bread is grilled, assemble the sandwich by first adding the meatball patty. Top with eggplant, cheese, then peppers. Drizzle the with olive oil. Sprinkle with salt and pepper. Enjoy!!
Meatballs
Everyone has that special recipe that they hold near and dear to their heart. Typically its a family favorite handed down from generation to generation. Something so special that you’ve contemplated putting it in a safety deposit box for fear it may be lost or stolen. But what if that recipe never even existed, even though you thought it should have?
I previously mentioned that my mom was born in Italy. Therefore she certainly had a special meatball recipe, right? How could a woman who cooked as well as she did not bring her version of this tasty concoction with her when she left the old country? The meatball was born there. So was she. What the hell! WHY?????
This is a woman who had hundreds of recipes written on everything from traditional note cards to the back of a napkin, but nary a meatball recipe in the lot. I cringe at the thought that I don’t have a handed down recipe of this Italian born round mound of meat.
But wait, did she even make meatballs? Surely I would remember this. If she made them I probably helped. I helped in the kitchen whenever I could and this would be no exception. But zero memories. Nada. Zip. Zilch.
So maybe the recipe isn’t missing….maybe it never even existed.
Ingredients:
- 1 1/2 pounds Ground Chuck
- 1/4 pound Ground Pork
- 4 slices of soft white bread, crust removed, cubed (soaked in 4 tablespoons of milk, then squeezed to remove excess moisture)
- 2 Eggs
- 1/2 cup of grated romano cheese
- 2 cloves garlic, minced
- 1 small bunch of fresh parsley, chopped
- 1/2 tablespoons salt
- 1/2 tablespoon ground pepper
Preheat oven to 375 degrees.
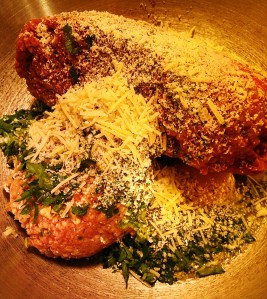
Place all ingredients in a large bowl.
Using your hands, mix all ingredients until well incorporated. Try not to over mix as this may cause the meatballs to get tough.
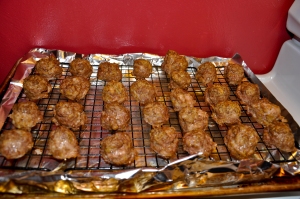
Using a scoop (for uniformity) or your hand, form in to balls (roughly the size just smaller than a golf ball) and place on a wire rack on a sheet pan lined with foil.
Bake on a wire rack in oven for 10-15 minutes until golden brown and no longer pink inside.
Add as a side dish to (my) pasta or serve as is, topped with sauce (which I’ll blog about soon) and grated cheese.


