Archive
Sweet Heat Meatloaf
In my opinion, there are 3 basic comfort foods: macaroni and cheese, anything served with a biscuit on the side, and meatloaf.
As a little kid I was never a big meatloaf fan. Mainly because I wasn’t thrilled with my mom’s version. She served it with some sort of tomato based sauce that she called “gravy.” Sometimes I didn’t know what that little Italian lady was thinking.
But that changed as I grew older and learned to appreciate just about anything my mom put in front of me.
Meatloaf is one of those things that you either love or you hate. There are cafeteria horror stories that people want to forget and there are memories that bring people back to their happy place. No in between with meatloaf.
Meatloaf, while pretty basic in nature, still affords many different versions and everyone has their own. Some use bread crumbs, some use actual bread, and me, I use saltine crackers (but sometimes I use the other things). Of course everyone has that special something that makes it their family secret.
Then there is the debate of whether to glaze or not to glaze using some tomato based product, typically ketchup.
I like it glazed….my wife doesn’t. Awkward!
I could do half and half but its not worth it and I just make it her way. We usually smother with gravy anyway.
I was however, dying for her to give the glazed version a try.
So what did I do? I did the sneak attack version and glazed it but didn’t tell her. So when it came out of the oven, she smelled something sweet and she was on to me. I told her to try it….worst case she could cut off the crusty glazed part and still be able to enjoy it.
What I didn’t tell her was the hook, line and sinker that would allow me to glaze it all the time. Instead of ketchup, I used a combination of brown sugar, ketchup and Sriracha. Sweet and spicy, how could she resist?
She didn’t and the rest is history. Enjoy.
Ingredients:
|
Cardamom-Wild Flower Honey Sauce
Earlier in the week Darcie got the “Hey, wanna go to the outlets?” text from our good friends Chuck and Josh.
Anyone that knows me understands that I was not part of this invite because I hate shopping (unless its to shop for a cooking gadget, food, electronics or a new car).
Not only do I dislike shopping, I also have slight fear of *Darcie shopping with Chuck and Josh (or anyone really).
Why? First, she’s a woman. Second, she’s never met a pair of shoes or a purse that she doesn’t feel deserves a good home. And finally, well, we’re not exactly Bill and Melinda Gates.
(*Note: Darcie actually does very well, and never overspends – and today she bought stuff for me. Probably good that she did since I refuse to part with a Polo shirt that I’ve probably had well over 10 years now).
Anyway, despite my disdain for shopping, Chuck and Josh’s invite to take Darcie shopping provided me an opportunity to whip up breakfast for a crowd which is more my cup of tea.
I kept it fairly simple. Darcie, with her mad baking skills, made homemade buttermilk biscuits. I made the homemade sausage and gravy to smother said biscuits. I also whipped up a zucchini and egg fritatta.
I’ll blog these dishes in the near future but today, I’m blogging about something I didn’t even make.
See, even though our friends asked what they could bring, we informed them we had it covered. But of course, this is Chuck and Josh, and they don’t show up anywhere empty handed. Which, in this instance I’m glad they didn’t.
Chuck made 2 amazing pastries. The first was a fig tart with a goat cheese spread. The second, and the star of today’s show was a cinnamon twist with a Cardamom-Honey Dipping sauce. The twist would have stood just fine on its own but when dipped in the sauce it went to the next level.
Amazing!
The sauce was sweet with a hint of spice. It was vibrant and bursting with citrus. With all the other food we had, this was all I wanted. Since there was a lot, I couldn’t wait to find uses for the remaining sauce that was left behind.
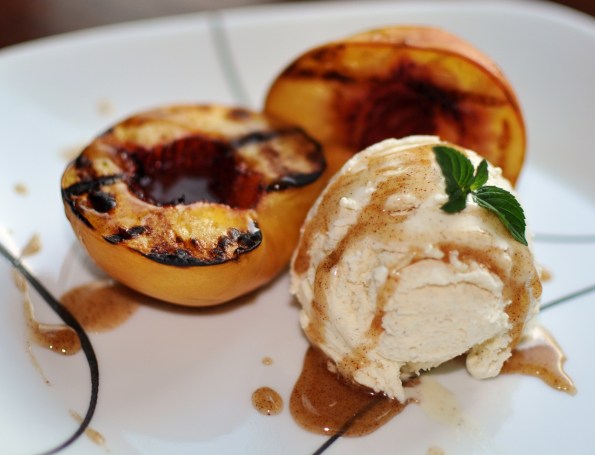
The first thing that came to mind was using this sauce drizzled over some grilled peaches and vanilla ice cream.
Winner!
I also think it would be good in tea (hot or iced) which I’ll try very soon.
The recipe for the sauce was taken directly from the Food Network but adapted slightly first by cutting the recipe in half (the original portion makes way too much) and by using wildflower honey instead of the more commonly found clover honey. Enjoy!
Ingredients:
|
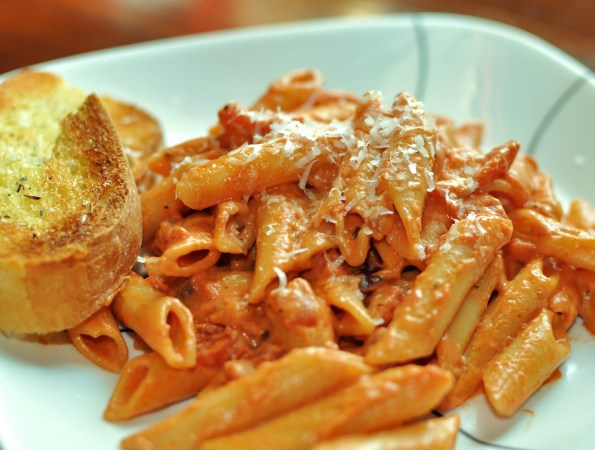
Penne alla Vodka
Let me begin by stating this blog entry was very close to not ever being written.
Why you ask? Well because the dish was almost ruined, along with my house during the process.
The recipe, which I’ll get to shortly, requires that you flambe’ part of it. For those not familiar, it is the cooking process where you essentially set your food on fire with alcohol.
Food and Fire – I’m in!
Since I’m a pretty decent cook AND I’ve seen the flambe’ process up close and personal at fancy restaurants where I ordered Banana’s Foster, I assumed I could do it without issue.
I’ll go on record and state…I can do it. You can do it too. Because setting food on fire IS easy. But not done properly IT IS DANGEROUS. Extremely dangerous. Dealing with the 3 foot high flame that ignites from this process will also scare crap out of you.
Now I’ve been known to exaggerate before (see my thunderstorm story here), but the height of the flame is no exaggeration. And once the flame was ignited, there was no turning back.
I really didn’t know what to do other than move it away from anything that would catch on fire and as low from the ceiling as possible. And since I’m over six-feet tall, I needed to crouch a bit as I waited for the alcohol to burn. Not an easy task.
With no way for me to put out the flame I needed to keep it out of harms way long enough to avoid a call to the insurance company.
The 60 second process seemed like an eternity and every time the flame got lower it grew again when I would move back towards the stove. So I waited with the hot pan of fire in my hand until it was gone.
With the flame gone and my eyebrows still intact, I moved the pan back to the stove, wiped the moistness from my face (and perhaps changed my skivvies) and proceeded to make one kick-ass pasta dish.
So now I that I lived to tell my story, I did some research on how to properly do this technique. Seems like I did it just fine, but my kitchen is too small and I should have avoided trying altogether. I also found out afterwards that while flambe’ is the best way to infuse your dish with the vodka, you could do it without this process.
I sure wish I had known that ahead of time….but then I wouldn’t have had this great safety lesson to share.
If you want to try flambe’ go for it, just make sure you have a fire extinguisher handy.
For those not as adventurous (read:stupid), here is the flambe’ free version. Enjoy!
Ingredients:
|
Grilled Pizza – Part II
With grilling season winding down for a lot of people I thought I’d do a second installment of grilled pizza just to remind people that you shouldn’t be afraid to try this method.
You can find the instructions, as well as some flavor combinations in my original grilled pizza blog entry here.
Here are my 4 grilled pizza promises:
I promise, if done properly, your dough won’t fall through or stick to the grill grates.
I promise that you will have some pretty darn tasty pizza.
I promise you’ll want to experiment with the endless combinations of toppings.
I promise that you will want to have a pizza party and impress your friends.
Because for some, it will become an addiction, I cannot promise a reserved seat in grilled pizza rehab.
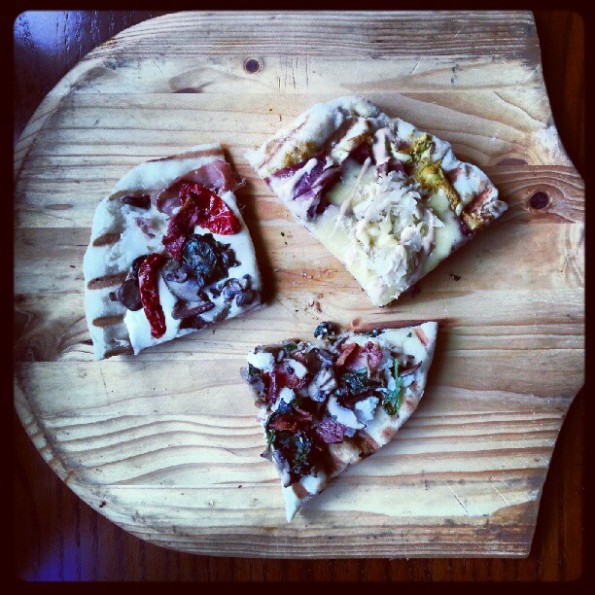
Since grilled pizza is somewhat my latest addiction, I thought I’d give a couple of new combinations a try. Instead of one large pizza, I (with Darcie, my sous chef for the evening by my side) made 3 mini-pizzas (technically 4 which I’ll explain shortly).
The first one was bacon, spinach, mushrooms, and fresh ricotta. We’ve done a similar version so what made this stand out was the ricotta. The crust was brushed lightly with a garlic butter. Not a bad combination at all.
The second pizza had the same crust base (butter/garlic) but was topped with prosciutto, roasted tomatoes, mushrooms, and fresh mozzarella. The salt of the prosciutto combined with the sweetness of the roasted tomatoes made this my favorite of the samples.
Finally, for the final pizza I made a Reuben pizza. Basically, the Reuben pizza was exactly like the sandwich, only in pizza format.
Initially when the Reuben pizza came to my mind I thought it would be as simple as copying the sandwich. However, I was afraid the Thousand Island Dressing as the base would make the pizza too soggy. So I talked it over with the wife and she agreed but we couldn’t agree on how to improvise. So we came up with 2 options (his and hers).
Her version had a plain crust with a very light sprinkle of Swiss to act as the glue. Then a layer of corned-beef, sauerkraut, Swiss cheese and a drizzle of Thousand Island.
My version used a spicy brown mustard as the base. Then corned-beef, sauerkraut, Swiss and topped with Thousand Island.
Both were very good in their own ways, especially if you like Reuben’s. Her version was probably closer to a real Reuben while my version was more like a version you’d find in a good New York Deli.
If I did it again, I’d probably use wheat dough and sprinkle in some caraway seeds.
The Reuben Pizza experiment wasn’t perfect but it still wound up being delicious. Here is “his” version of the Reuben Pizza. Enjoy!
Ingredients:
- Basic Dough
- Brown Mustard (enough to put a thin coat on the crust)
- 1/2 pound corned-beef, cut in to squares (don’t skimp here — spend a little extra and get the good stuff)
- Sauerkraut (more or less based on your preference)
- 1 1/2 cups Swiss cheese, grated
- Thousand Island Dressing
Follow instructions to make pizza dough and shape in to desired size.
Paint the crust a thin layer of mustard.
Top with corned beef, sauerkraut, and cheese.
When the pizza is finished, drizzle the entire pizza with the Thousand Island Dressing.
Cast Iron Potato-Onion Gratin
Work has been absolutely nuts recently. Because of the craziness, 12-hour days have been the norm and I haven’t really had much time enjoy dinner with my family.
So it was nice to just wake up this morning and ease in to Saturday. Without plans other than a few errands, I could take my time and make a nice breakfast.
I looked around the kitchen and realized I didn’t have much to go on. A couple of potatoes, an onion, some cheese and a cast iron skillet.
Sounds like a gratin.
I happen to like the cast iron because it retains heat well, gets food nice and crisp, is oven safe, easy to clean, and makes for a cool presentation.
If you don’t have a cast iron skillet, fear not. This can be made in any skillet you have as long as its oven safe.
I made eggs and toast and breakfast was served. You could also make it for brunch or even dinner. Enjoy.
Ingredients:
- 2 Large Yukon Gold potatoes, sliced thin. (Rinsed and dried well)
- 1 medium vidalia or red onion, sliced medium (keep in rounds)
- 1 small clove garlic, minced
- 2 tablespoons butter
- 1/3 cup mozzarella
- 1/3 cup Gorgonzola
- Olive Oil
- Salt and Pepper
Preheat oven to 350.
Add potatoes to a large bowl, coat with olive oil, salt and pepper. Toss to combine. Set aside.
Meanwhile, over medium-high heat, melt butter.
Add garlic and saute’ for 30 seconds.
Next, arrange onions in circle around the pan. Cook, without moving for 2 minutes.
Then, layer potatoes in a circular pattern around the pan to slightly overlapping.
You should end up with around 3 layers of potatoes on top of the onions in a circle that covers the entire diameter of the pan.
Drizzle with a tiny bit of olive oil, salt and pepper.
Top with cheese.
Bake for 20-30 minutes or until potoates are cooked and crisp (but not potato chip crisp) and cheese is melted and golden brown.
Cut in to wedges. Serve immediately.
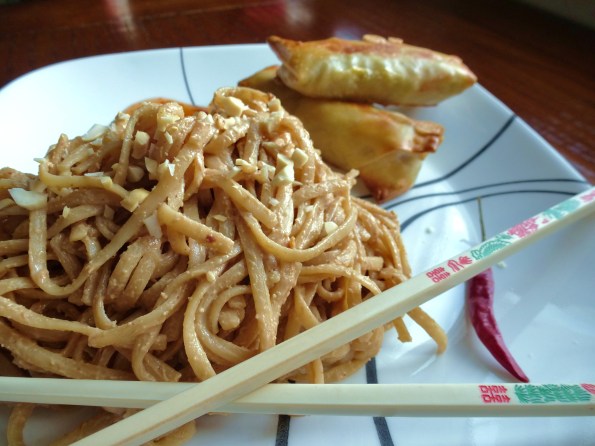
Spicy Sesame Peanut Noodles and Baked Egg Rolls
When I met my future wife she openly admitted to me that she wasn’t destined to be crowned “Top Chef.” Lucky for me (and my family) she didn’t have to be because I love to cook and I take ownership of that responsibility.
Now that doesn’t mean that I’m solely responsible for meals. She willingly chips in when she has to. However, she knows her limitations. A crockpot or one dish meal with limited, familar ingredients and she’s typically willing to give it a try. Complicated ingredients like, ummm, err….rice. Probably not happening.
So recently I had planned to come home and make Peanut Noodles and Egg Rolls. I had laid out the recipes and the ingredients so I was ready to hop to it the second I got home. However, unforeseen circumstances (sometimes I call it Monday) kept me from getting out of the office on time. I informed my wife of this via text and she replied “I’m going to start dinner, is that ok?”
Since peanut noodles AND egg rolls both fall outside of her comfort level, I wasn’t sure how to respond. I could have easily played the ‘I’m too busy to respond’ card and would have come home to fabulous gourmet frozen chicken tenders. But being the good husband that I am, I shot her a text of encouragement simply saying “Yep. It will be easy.”
The meal was excellent and she was VERY proud of her accomplishment. Not proud because it was good (although she should have been because it was delicious) but rather because she used the food processor without issue.
I love this woman.
I would be remiss if I didn’t tell everyone what a WONDERFUL baker my wife is. Everyone I know raves about her desserts and my waistline is further proof. Be sure to come back in the Fall when she goes crazy. I’ll blog all about it.
And oh, don’t think I don’t know I’m being played for a fool. I know she can cook….but she has me right where she wants me.
For the Noodles
Ingredients:
- 1 box linguine noodles
- 1/2 cup smooth peanut butter
- 1/4 cup low sodium soy sauce
- 1/3 cup warm water
- 2 tablespoons fresh ginger
- 1 clove garlic
- 2 tablespoons red-wine vinegar
- 1 1/2 sesame oil
- 2 teaspoons honey
- 1 teaspoon red pepper flakes
- 1/4 cup chopped unsalted peanuts (for garnish)
Cook noodles according to package. Drain and rinse well with cold water.
Meanwhile, add all other ingredients to a blender and puree until smooth.
Combine with noodles and toss. Serve immediately.
For the Egg Rolls (makes 6)
- 6 egg roll wrappers
- 1/2 of a one-pound bag prepared cole slaw mix
- 1/2 teaspoon garlic, minced
- 1/8 teaspoon ground ginger
- Splash of soy sauce
- Olive Oil cooking spray
Preheat over to 375.
Meanwhile, put cole slaw mix in a bowl and microwave covered for 3-4 minutes. Drain well to remove excess liquid.
Add soy sauce, garlic, and ginger. Mix.
Add heaping spoonful of mix to the center of an egg roll wrapper and fold according to directions.
Repeat for each roll.
Spray baking sheet with olive oil spray.
Line rolls on baking sheet and spray the rolls.
Bake 15 minutes. Flip. Bake additional 10 minutes or until golden brown.
Serve with soy, duck sauce, or my favorite, sweet and spicy asian dipping sauce.
Black Bean Fritters
Do you get stuck in a rut making the same things over and over and over and over and….
That was me last year. As much as I love to cook, I still felt like I was making the same 10-12 dishes. Sure I’d throw in something new every now and then to break it up, but for the most part it was getting pretty monotonous.
I think the reason for this is comfort. For me, it really is much easier to go with what I know. With familiar ingredients, it was easier to plan, easier to shop, and took less time to cook. Makes sense when life is busy.
Despite often being busy, I was determined to break through my cooking barriers. So at the onset of 2012 I made a commitment to try at least one new dish every week. I’m very much on target, and running the blog helps me stay on track. I think at one point earlier in the year I made 7 straight meals that I’ve never made before.
With 2012 half gone, I continue trying more and more new things. And even when I go to the well for an old stand-by recipe, I’ll try to tweak it to make it new and fresh. Thus, dinners have been far from boring.
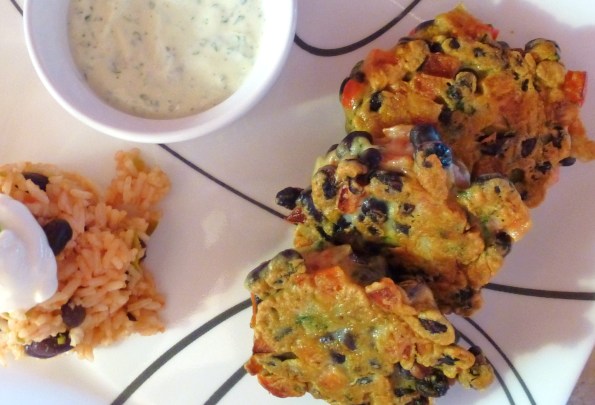
The most recent new meal I made is this black bean fritter. It contains simple, easy to find, mostly fresh ingredients. It doesn’t take long to make. They’re filling. Most of all, they taste good. They would be great as an appetizer, or as the main dish paired with a side of rice.
Serve the fritters with a dipping sauce for added flavor and freshness. I think it they would be excellent dipped in a chipotle dip but I went with a cilantro dip that was included in the original recipe that I found. Even though I made the cilantro dip, I’ll include a quick easy chipotle dip recipe as well. Enjoy!
For the Fritters
Ingredients:
- 2 cans of black beans, rinsed
- 1 red or yellow pepper (either – for color)
- 1/2 white onion, diced (more or less based on your taste)
- 2 cloves garlic, minced
- 1 tomato, chopped fine
- 1 handful of fresh cilantro, chopped fine
- 2 eggs
- 1/2 cup all-purpose flour
- Salt and pepper to taste
Combine all ingredients in a large bowl and mix well to incorporate. Mixture will look wet but shouldn’t be too wet or loose. Add a tablespoon or more of flour as needed, but you should be ok with 1/2 cup. Season with salt and pepper.
In a medium sized pan, heat olive oil.
Using an ice cream scoop, add a scoopful of mixture to the hot pan (I can get 3 or 4 in a pan).
Cook each fritter 3 minutes on one side. Gently flip and cook another 3 minutes or until golden brown.
Serve immediately with dipping sauce (Or store on a metal try in the oven preheated to 225 degrees until all fritters are done).
For the Cilantro Dipping Sauce:
Combine 1/2 cup of plain greek yogurt (or sour cream), 1 minced garlic clove, 2 tablespoons fresh chopped cilantro, 1 teaspoon of sugar, and salt and pepper in a bowl. Whisk to incorporate.
For the Chipotle Dipping Sauce:
Combine 1/2 cup mayonnaise, 1 chipotle pepper (in adobo sauce – diced fine), juice of 1/2 lime, pinch of cumin, and pinch of salt in a bowl. Whisk to incorporate.
Mushroom and Spinach “Wellington”
It’s safe to say that I love good competition, especially sports.
I hold season tickets to Pitt Basketball and Football so I can passionately cheer for my team in person.
I never pass up going to a hockey game when I get tickets and I root from the recliner when I don’t.
I love the Olympics. No matter the sport, I cheer on the United States and still get a bit choked up when then National Anthem plays.
I yell obscenities at the refs when a bad call is made (on TV and in person).
I celebrate when my teams win…and I’m visibly upset when they don’t.
I also love cooking competitions. Iron Chef, Food Network Star, Chopped, Throwdown, and BBQ Pitmasters are ones I watch regularly.
More recently I’ve become addicted to Masterchef. I think its the polite side of Gordan Ramsey that sucked me in. Or maybe a blind contestant. Either one, I’m hooked.
Then there is Hell’s Kitchen. It’s hokey. It’s trashy. It’s a train-wreck. It’s addicting!
All I have to say is that if I was ever going to be a contestant I’d certainly learn how to properly prepare Risotto and Beef Wellingtons. It is clear those dishes are to be mastered if you’re going to run one of Ramsey’s multi-million dollar establishments. What’s bizarre is that I rarely see either on the dinner menu of the restaurants I frequent. Maybe I need to get out more.
While I don’t plan on auditioning for Hell’s Kitchen (or any cooking competition) any time soon, I am proud to say that I have mastered the art of Risotto.
Wellington’s? Read on.
A Wellington, which is assumed to be named after the Duke of Wellington, is a piece of beef, most commonly filet, wrapped around a piece of puff pastry.
I know right? Why ruin a nice filet by wrapping it in dough. Honestly, it never sounded good to me so I never tried it.
Then I came across a recipe that was a spin-off of the Beef Wellington. A vegetarian version.
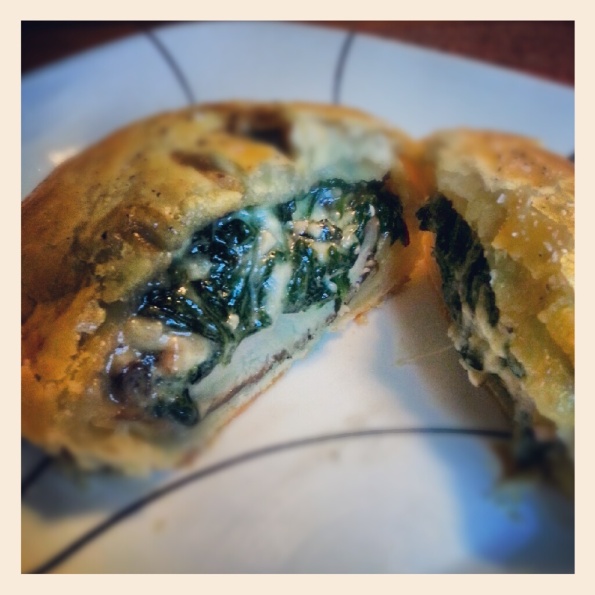
After reading through the recipe and looking at the pictures, this made more sense. Mushrooms, spinach and cheese wrapped up in a flaky dough, baked golden brown. YUM!
This was so delicious that I’m already thinking up new ways to serve it.
This take on the wellington is so freaking good….oh, enough of me writing…on to the recipe.
Ingredients:
- 4 portobello mushrooms caps
- 3 cups crimini (or any type you prefer) mushrooms, chopped
- 2 tablespoons butter
- 1 bag of baby spinach
- Olive oil
- 4 garlic cloves, minced
- 2 teaspoons balsamic vinegar
- 2 tablespoons butter
- 1 tablespoon Seasoned Bread Crumbs
- 1 cup freshly grated Swiss Cheese
- Pinch of Crushed Red Pepper
- Salt and pepper to taste
- 1 sheet of Puff Pastry dough
Heat oven to 375.
Prep portobello mushrooms caps by removing the gills with a spoon.
Lightly coat both sides of the cap with olive oil. Sprinkle with salt and pepper. Bake for 10 minutes.
When done, remove from oven and place on paper towels to remove excess moisture. Set aside.
In a medium sized pan, heat 2 count olive oil over medium heat.
Add half of the minced garlic and saute until fragrant. Add spinach, salt and pepper, and cook for a few minutes to wilt. Drain liquid, set aside.
In the same pan, add another 2 count olive oil and remaining minced garlic. Add crimini mushrooms, salt, pepper, and balsamic.
Cook for a few minutes until most of the moisture has been removed from the mushrooms. Set aside to cool.
Once spinach and mushrooms have cooled, combine both in a bowl and mix in cheese and bread crumbs. Set aside.
On a floured surface, roll pastry dough and cut in to 4 even squares.
Fill each portobello cap with 1/4 of the spinach and mushroom mix.
Top with one pastry dough square. Carefully invert it.
Add egg wash to corners of dough and fold each corner to make sort of a puff-pastry package.
Continue this process with the remaining 3 mushroom caps.
Place on baking sheet, brush with egg wash, top with a sprinkle of course salt and fresh cracked pepper.
Cut a few holes to allow steam to escape.
Bake 25-30 minutes or until golden brown.
Serve immediately (caution – HOT). Enjoy!
Pasta in Garlic Sauce
If you run a food blog, love to cook, or you breath, then chances are you’ve heard of Pinterest.
If you’re unfamiliar, Pinterest is a site where registered users from all over the world “pin” just about anything they think of. Movies, books, fashion, photography, funny quotes, and of course, recipes. Its an online bulletin board of sorts meant to peak your interest and inspire.
When I first heard of Pinterest I wasn’t sure what to make of it. But then I started looking over my wife’s shoulder as she browsed the site. Seeing all of the magnificent looking desserts she viewed, I decided to give it a whirl on my own.
I’m glad I did.
I mainly review the food and drink “pins” and I’ve been incredibly inspired by so many talented food bloggers that I discovered. The blogs I found through Pinterest have given me tons of recipes of to try. Pinterest may have even been the final piece of motivation I needed to start my own blog.
Most recipe “pins” are unique, but sometimes there will be one or two “pins” that keep showing up over and over again. These recurring “pins” are known as a ‘repin’ and serves as a measure of popularity.
Such is the case with the recipe I’m about to share. I’ve seen this recipe pinned so many times that it was virtually impossible for me not to want to give it a try.
Pinned as “Spaghetti in Garlic Gravy with Herbs and Lemon Marinated Chicken and Cherry Tomatoes”, this recipe is a refreshing summer pasta dish that makes excellent use of fresh cherry tomatoes that are cropping up in backyard gardens all over the country.
I thought the name was too long, plus I omitted the chicken, so I simply call it Pasta in Garlic Sauce. Enjoy!
Adapted from Godess of Scrumptiousness Blog
Ingredients:
- 1 pound (box) pasta
- 1/2 stick butter
- 2 tablespoons olive oil
- 4 garlic cloves, minced
- 2 tablespoons all-purpose flour
- 2 cups low-sodium chicken stock
- 2 tablespoons of fresh basil, chopped
- Salt and Pepper to taste
- 1/2 cup Parmesan cheese, grated
- 1 1/2 cups cherry tomatoes
Cook pasta according to package.
Meanwhile, over medium heat, melt butter and olive oil.
Add garlic and saute approximately 1-2 minutes or until garlic is soft.
Add flour and stir. Cook for approximately 1 minute.
Add chicken stock and simmer until thick.
Add salt and pepper to taste.
Add basil and drained pasta. Stir to combine.
Add tomatoes and cheese and gently toss.
Plate the dish and top with a small sprinkle of basil and a bit more cheese.


