Archive
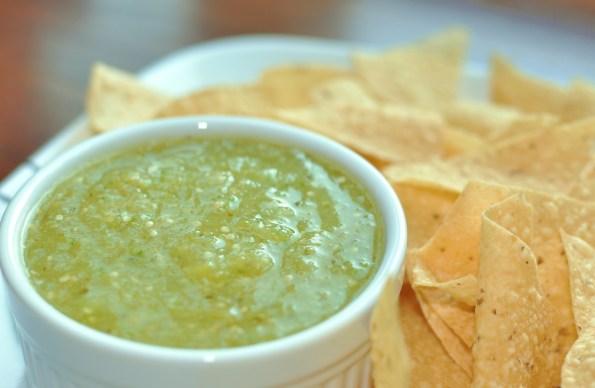
Salsa Verde
I love chips and salsa.
Give me the salty crispness of tortilla chips and a nice bowl of spicy (but not burn my mouth hot) salsa and I’m nearly good to go. Just need to throw in an icy cold beer, the remote control, and a sporting event to make it complete. A couch potato’s dream!
Recently my love affair with green salsa has taken center stage and I feel like its the only color salsa I’ve been eating as of late.
Even though I’ve made home made tomato based salsa many times, admittedly, I’ve always bought the green version pre-made.
Although I’m not sure why, I think I may have initially been intimated by a tomatillo, the vegeta…errrr…I mean berry, needed to make salsa verde.
I feel as though I must give a quick reminder that tomatoes, whether red, yellow, striped or green are all berries. I won’t go in to the details, I trust that those with Botany degrees know what they’re talking about. (Ok, one more tid-bit — strawberries are not berries — weird right?)
Anyway, back to the tomatillo. You can find them in the vegetable section of your grocery store. You may have to go to a larger grocery store though as not every store I’ve been to carries them. (I get mine from the local Mexican grocer). They come with a paper husk on them which you will need to peel when you get home. Once peeled they’re quite sticky so they need a good rinse. Also, they are $3 or $4 a a pound, but don’t be alarmed, they don’t weigh a ton and you don’t need a lot to make a batch of salsa verde.
Once made, you can store it in an airtight container, refrigerated, for roughly 2 weeks (if it lasts that long)
By the way, if you’re going to make good homemade salsa, try to pair it with homemade chips.
To make your own, just buy a pack of corn (not flour) tortillas, cut in to triangles and deep fry in 350 degree oil just long enough to make golden brown. Remove from oil, let drain on a rack over a newspaper lined sheet pan. Season with salt while hot. Thank me later.
I’ll mention I don’t always want to go through the deep fry trouble, so instead I make sure to use good quality tortilla chips. They cost a bit more but are worth it. Xochitl is my favorite. Enjoy!
Ingredients:
|
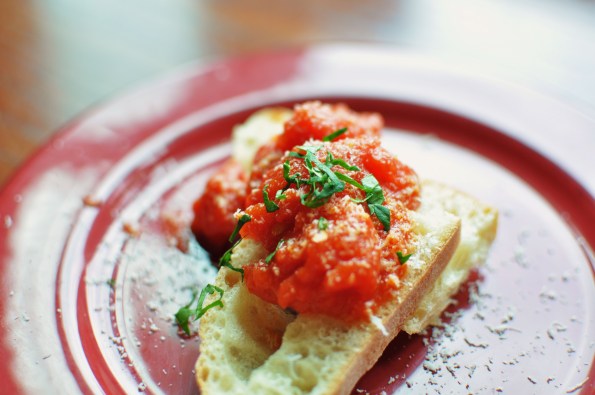
Marinara Sauce
My very first blog entry was homemade pasta where I promised I would have a future entry dedicated to the sauce I use with it. Nothing.
Then a few weeks later I made the meatball entry, where again, I made promise to blog my sauce recipe. Still nothing.
I did pizza entries (both on the grill and my deep dish) both of which need sauce, but yet, no sauce recipe. (Yikes)
I think the last straw for me to get off my butt and actually write about it came recently when a couple of friends of mine asked “When do I get the sauce recipe?”
Guess I better get to it.
Oh, but before I do, let me mention that a good marinara sauce is one of the simplest things you can make. It tastes better than jarred sauce (and its better for you). It’s cheaper than jarred sauce (stock up when canned tomatoes are on sale). And best of all, it is just as quick to make as sauce from a jar. Not to mention, other than the tomatoes, most everyone has all the ingredients in their pantry.
Take that convenience argument!
(If you don’t have garlic, salt, pepper, olive oil in your pantry, shame on you – quit reading and run out and buy these staples and keep them on hand – don’t forget the tomatoes)
Finally you might be thinking why canned when there is an abundance of tomatoes in season right now? Personally, I think they taste better for *sauce. (*I like fresh tomatoes for things like salsa)
Ingredients:
Use sauce for pizza, pasta, meatballs, sausages…..or as is served over a nice piece of crusty bread topped with grated Parmesan. |
Buttermilk Salad Dressing
Mid-Summer is here and that means its hot. Sticky, muggy, soupy, humid hot! Needless to say, I’m not a fan.
As a kid, I loved everything about this time of year. I swam during the day and played baseball during the late afternoon until dark. When the sun went down, I played games such as “hide and seek” (outside). I would hunt down the ice cream truck and stay up way past my normal bed time. When you’re a kid, what’s not to love about summer?
Fast forward 25 years and my summers are all about swatting mosquitoes, wondering if the heat is killing the lawn, and praying the air conditioner survives 90 degree days.
Although I’m not a fan of Summer, there is a huge benefit. Fresh vegetables from the garden.
My wife hasn’t had much luck with the garden the past couple of years. She attributes it to the clay soil that makes up a lot of back yards in Western Pennsylvania. Me, I just think it was bad luck. Or the stink bugs.
This year, she was determined to bring back the bounty. She did some research and figured the best way to do this, while remaining as organic as possible, was to try out a few garden beds.
She kept it simple by mainly planting salad staples like tomatoes, lettuce, and cucumbers.
So far the results compared to last year are night and day.
Now that we’re eating fresh veggies all the time, I insist that I top it with an equally fresh dressing.
Here is an easy recipe for buttermilk dressing, that will make you leave the bottled dressings on the grocery store shelf.
Ingredients:
- 1/2 cup Buttermilk
- 3 Tablespoons Mayonnaise
- 1 Clove Garlic, minced
- 1/4 Teaspoon Kosher Salt
- 1/4 Teaspoon Black Pepper (fresh cracked)
Add all ingredients in a mason jar. Put the lid on and shake it to blend all ingredients. Spoon the dressing on lettuce, cucumbers, and tomatoes (or whatever you like in your salad).
Enjoy!
Beer Cheese Burger
When I was a kid it seemed as though every summer weekend my parents were dragging me to a picnic at South Park (a county park in the suburbs of Pittsburgh). There was the bowling league picnic, the church parish picnic, and the corner bar patron picnic. Every picnic seemed exactly like the previous one. The adults were drinking beer and playing horse shoes while the kids were running around trying to figure out which half-empty can of Cherokee Red was theirs. If a kid wasn’t sure, they’d just get a new one.
The food was always the same too. It was a smorgasbord of corn on the cob, hot dogs, and burgers.
Even though I ate my fair share of burgers, there was never anything special about them. The burgers were flat over-cooked discs of meat (in the 70’s it wasn’t safe to eat a burger that was pink in the middle) and the toppings were minimal (american cheese and ketchup or mustard). But I was a kid and this was really all I knew. And I loved them.
Now that I’m grown, my love for burgers has not changed. The burgers I make are fatter and its rare (no pun intended) that I’ll eat one that isn’t somewhat pink. I also like to mix it up when it comes to toppings. My latest venture was the *Beer Cheese Burger.
*Modified from the recipe found in the June 2012 issue of Food Network Magazine
Ingredients:
- 1 1/2 pounds ground chuck
- 1/4 pound of ground pork
- 2 tablespoons butter
- 2 tablespoons flour
- 1/4 teaspoon mustard powder
- 1/4 teaspoon cayenne
- 3/4 cup of beer
- 1/2 cup half and half
- 1 1/2 cups sharp cheddar cheese, grated
- 1/2 tablespoon of grated horseradish
Mix together ground chuck and ground pork. Form to make 4 patties. Grill.

Burgers ready for the grill. (Not pictured: before grilling put an indentation in the middle. This will prevent the burger from “puffing” while cooking)
While the burgers are grilling, melt the butter over medium heat. Stir in the flour, ground mustard, and cayenne to make the roux. Stir about 2 minutes to cook out the flour.
Stir in beer and bring to simmer. Then stir in the half & half and simmer while stirring about 2-3 until thickened.
Stir in the cheese and horseradish until melted.
Pour a few tablespoons over your burger and enjoy! This cheese can also be served with pretzels, over a baked potato, or on a hot dog.
Easy Balsamic Vinaigrette
On Saturday’s, our local PBS would air 2 or 3 hours of cooking shows. I’d sit and watch but never understood why. Certainly I didn’t think I could make the types of meals that someone like Julia Child would whip up. While I didn’t think it was possible to cook like those I watched, it did begin my love affair with watching cooking shows on TV.
Considering the first 10-12 years of my life I had 3 television channels (4 if the antenna worked perfect and there were no clouds in the sky), its hard to believe that now, not only do I have one but I have TWO channels dedicated to nothing but cooking and food (3 if you count some of shows on the Travel Channel). And it’s no secret, I’m addicted to these channels. Don’t believe me, ask my wife. I watch shows related to cooking more often than I watch the 300+ channels that I currently overpay for combined (and this includes sports — yes, sports). Bobby Flay, Alton Brown, Tyler Florence, Giadia de Laurentis, Ina Garton, just to name a few, have taught me so much over the years that I feel like I should have paid them for cooking lessons.
One thing I learned while watching these shows is that sometimes making something taste so good can be unbelievably easy. In addition, making things homemade are generally healthier and can save so much money. This is easily the case with this balsamic vinaigrette. Its made from simple ingredients that most people have in their pantry right now. Best part, it can be whipped up in as quickly as you can chop a clove or two of garlic. Knowing this, it’s a wonder why I haven’t been doing this my whole life.
This recipe was adapted from the original Food Network star, Emeril Lagasse.
Ingredients:
1/4 cup balsamic vinegar
3/4 cup olive oil
2 teaspoons brown sugar (original recipe calls for this to be optional and dark brown sugar, but I prefer light brown sugar and I do NOT make this optional)
1-2 cloves garlic, chopped
1/2 teaspoon kosher salt
1/2 teaspoon freshly ground black pepper
Place all of the ingredients in a mason (or any jar) with a tight fitting lid. Shake the heck out of it. Drizzle on your favorite salad.
All ingredients in the jar before you shake it
After you shake it
You can easily double or even triple this recipe. It will keep in the fridge for 3-5 days. Just make sure its covered tightly and you shake it before the next use.
Sorry, this blog entry does not come with a side of grilled pizza, but a future entry will be dedicated to all things grilled pizza. Look for it in the near future.


